Bleeding The Brakes
| Time, Total Time, Cost, First-Time Cost | 30min, 1h20min, $10-30, $60-300 |
| Number of Persons | 2, or 1 with special parts/tools |
| Difficulty level | 3 |
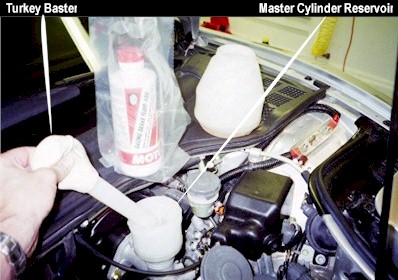
| Tools | turkey baster, 10mm combination wrench |
| Special Tools | bleeding bottle |
| Special Parts | fluid (1/2-1 liter), speed bleeders (optional) |
| Service Manual Pages | 19-10,11 |
| Service Interval | 2 years or 30,000 miles |
| Prerequisite | Jack (20min), Wheels (30min) |
| FAQ |
Why Bleed?
The NSX, like all modern cars use a hydraulic system to operate the
brakes. For a hydraulic system to function it must be closed and completely filled
with fluid, and leak-free--no fluid out or air in. In a closed, properly sealed
hydraulic system, the following law is true: fluid cannot be compressed to a lesser
volume, no matter how high the pressure. We call this hydraulic fluid "Brake
Fluid". Unfortunately, no brake system is completely closed and eventually air,
which contains water vapor, mixes in with the brake fluid. This is bad news because
it lowers the boiling point of the fluid. Boiled fluid leaves behind tiny gas
bubbles which are compressible and gives us that initial "mushy" pedal feel.
In bad cases, this "air" in the lines can severely limit the amount of
hydraulic force available to stop the car! It is wise then, to replace this
contaminated fluid; the service manual recommends every 30,000 miles or 2 years. A good
DIYer will bleed the system at least annually. Tracking
the car demands perpetual replacement of the fluid. A street driver will want to pay
close attention to the Wet Boiling Point
properties of the fluid, a tracker will only be concerned with the Dry Boiling Point properties as they will be
changing the fluid before it has time to absorb water.
Cautions
Use a DOT 3 or DOT 4 fluid only, DOT 4 is preferred. DOT 5 is silicone-based and is incompatible with our
brake system. Try not to mix brands of fluids.
Brake fluid is an excellent paint remover. Immediately flush with water if you
accidentally get some on your car.
Wear gloves and safety glasses
to avoid an improper relationship with the fluid.
Dan's Recommendations
I Use Motul 600, ATE
Super Blue (Let's support our NSX vendors!) or a similar
high-temp fluid, speed bleeders and the Griot's Garage bleeding bottle. I
track my car so using a good high-temp fluid is mandatory. Griot's bottle is only
$35 and is worth the price. Speed bleeders make the job a quick one-person operation
and are reliable and inexpensive. Even if you don't' track your car, you should
still use brake fluid that meets DOT 4 specifications for wet boiling point (311 F).
Procedure
Make sure you have all your tools and supplies. Use an assistant if you don't have speedbleeders or another one-person bleeding system. Your helper can be anyone who can press a brake pedal and follow simple commands like "DOWN" and "UP", your dog is not recommended, sorry. Use the entire bottle(s) of fluid, unsealed brake fluid does not keep well as it absorbs moisture so it is useless.
We will be extracting the fluid from the bleed screw located on the top of each brake caliper. The service manual indicates that order matters, so we will begin bleeding the right rear (RR) first, then cross the vehicle to the left front (LF). Remember, the master cylinder is really a dual cylinder; the RR and LF brakes are operated by one and the LR and RF the other. We bleed the longest brake line first (RR) and complete the sub-system with the LF, then move on to the next longest line (LR) and complete the sub-system with the (RF). So, we're really bleeding two separate systems.
Suck out as much old fluid as possible with the turkey baster
Refill reservoir with the new freshly-opened bottle of fluid (no old crap)

Bleeding Order: Right Rear (RR), Left Front (LF), Left Rear (LR), Right Front (RF).
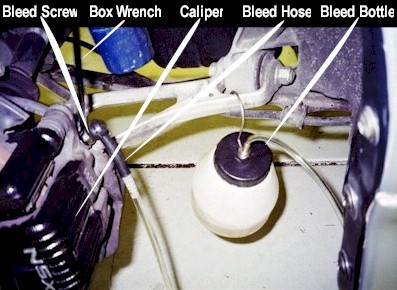
Remove the black rubber cap from the bleed screw and place your 10mm (3/8" for Speed Bleeders) box-end wrench over the screw and place your catch bottle tube over the bleed screw nipple.
Open the bleeder valve by turning the wrench about a 1/4 to 1/2 turn (counterclockwise). Now, instruct your assistant to push the brake pedal down by saying "DOWN". The pedal should travel easily as the fluid is pushed out of the bleeder valve. Your assistant should be gentle and smooth with the pedal motion. When the pedal is down your assistant should reply "OK". Now, gently tighten the bleed valve (finger tight) and instruct your assistant to let the pedal up by saying "UP", your assistant should say "OK" when the pedal is back up. Take a look at the extracted fluid see any air bubbles and/or dirty fluid? Yuck!
Repeat step 7: "DOWN", "OK", "UP", "OK", "DOWN"... 10-15 times for the rears, 5 times for the fronts. After every 10 pumps, re-fill the reservoir, forgetting this step will cause the reservoir to go dry and air to be trapped in the line, this is not good! When you're finished with a caliper, tighten the bleeder screw to 7 lb-ft. 7 lb-ft. is not much torque and I don't get out my micro-torque wrench to do this, I just tighten the screw until it is snug and am careful not to over-tighten. Place the black rubber cover back on the bleed screw to keep out derbies.
Go ahead and repeat step 7&8 in the proper order for the remaining calipers. Remember to finish the procedure with the fluid close to the MAX mark on the master cylinder reservoir.
Excellent! Now get in the driver's seat and press on the brake pedal a few times until you get a firm pedal. After a few pumps, the pedal should become very firm, go ahead and put some pressure on it, is it still firm? Good. If the pedal slowly sinks to the floor, check for fluid seeping out of one of the bleeder screws, re-tighten and check for a firm pedal. In the NSX there will always be some "mush" at the very beginning of the downstroke resulting from normal play in the linkages and in the brake booster, forget about it.
Happy Braking!!