Changing The Engine Oil
| Time, Total Time, Cost, First-Time Cost | 20min, 40min, 6qts of Oil + filter(~$15), $10 - $100 |
| Number of Persons | 1 |
| Difficulty level | 2, messy level of 5 |
| Tools | Torque wrench, 17mm combination wrench, funnel, oil pan, oil filter wrench, rags, 17mm socket, crush washer (for drain plug), Simple Green or citrus degreaser |
| Special Tools | |
| Special Parts | Oil Filter 15400-PL2-004, Crush Washer 94109-14000 |
| Service Manual Pages | 8-4,5 |
| Service Interval | Every 7,500 Miles |
| Prerequisite | Jack (20min) |
| www.nsxprime.com, change oil, oil |
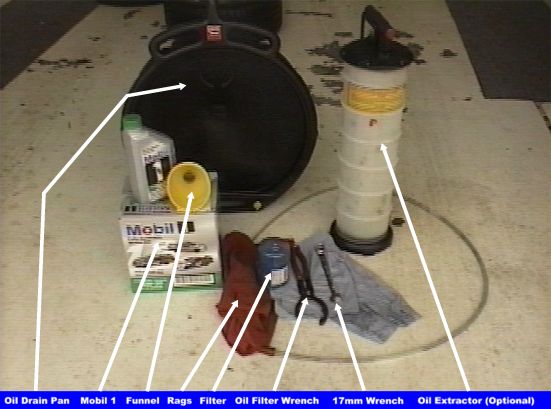
1. Prepare tools, parts and supplies. We will need a 17mm
combination wrench, funnel, oil drain pan, oil filter, oil (at least 5.3 US
qt.), oil filter wrench,
rags, a torque wrench with a 17mm socket and a drain plug crush washer. This job
can be a little messy and it may be a good idea to have a few garbage bags, some
rags and some shop towels around. Latex gloves can keep your hands from getting
all oily and may help protect your skin from the hot oil, which will inevitably
find a way to drip on your skin. Simple Green or similar degreaser is a
nice thing to have on hand to aid in cleanup.
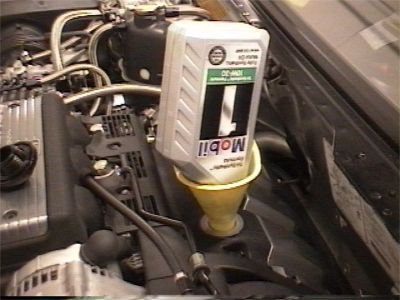
The oil you use is up to you, I use Mobil1 10w-30 tri-synthetic (green label,
see pictures above). The service manual recommends: API Service Grade:
Use "Energy Conserving II" SG grade oil, 10w-30 preferred. There
has been, and will continue to be, discussions about what kind of oil is best
for our engines. There are lots of NSXes out there running with both synthetic and
non-synthetic oils and they all seem to run just fine and forever.
In my case, I track my car often so I use a "better" oil (Mobil1
synthetic) and change it often (whenever it starts to get a little
dark). This is certainly overkill, but piece of mind goes a long way; plus
changing oil is so much fun!
The oil filter part number is: 15400-PL2-004. If the dealer you are buying
from doesn't have it in stock and wants to sell you something close (like the
Legend oil filter), then respectfully stand your ground and either special-order
one from them or order from someone else. I order mine in quantities
of six from Mr. Tracy Townsend (NSX
Parts Guy) and while we're at it, don't forget to order an equal amount of
drain plug crush washers: part number 94109-14000.
2. Carefully jack up and support the
car Note: some people just jack up the right rear of the car and remove
the right rear wheel to get to the filter and drain plug; I've never done
this so I can't really comment on how well this procedure works. Remember to
double-check your jack stands and make sure they are safe and secure before
climbing under the car.
3. With adequate ventilation in your garage, start the engine and let the
dashboard temperature gauge come up to normal
operating temperature, which is about 1/2 way up the dial. Warming the
engine oil allows it to carry more dirt and grime away in suspension. Note: steps 2 and
3 can be reversed and instead of warming your car up on jack stands in the
garage, you can warm it up by driving around town.
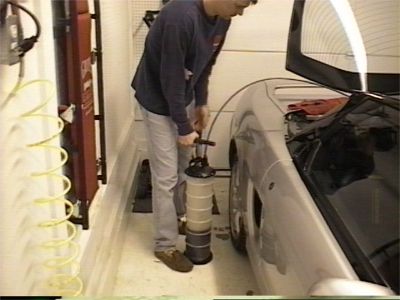
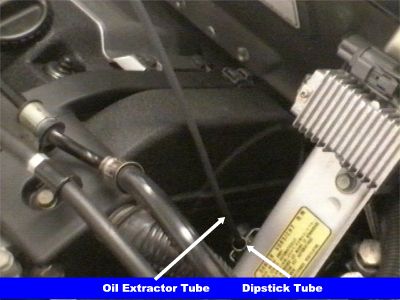
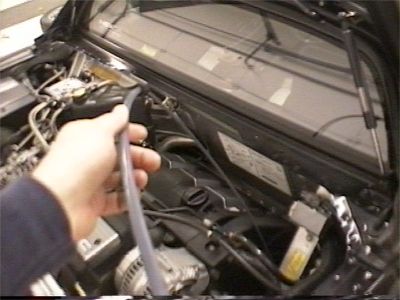
4a (Optional) Extract Oil. Griot's Garage has this pretty cool Oil Extractor that I use which makes this job a little easier and it also pulls out a little more oil than draining. If you don't have one of these neat little things then proceed to step 4b. Otherwise: remove the oil dipstick and push the smaller diameter extractor hose down the dipstick tube a few feet. Pump the extractor a few times while you fine-tune the position of the hose. Once you find the "sweet spot" the extractor will start sucking oil, then all you have to do is play around with the hose position a little bit to work it into the lowest spot in the oil pan and pump the extractor a few times. In about 5 minutes all the oil should be extracted. When the extractor starts coughing, you may want to pump it a few times and reposition the hose to make sure all the oil that can be, is extracted. That's it; proceed to step 5.
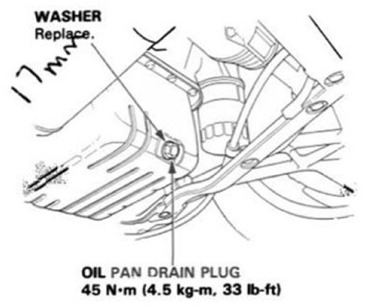
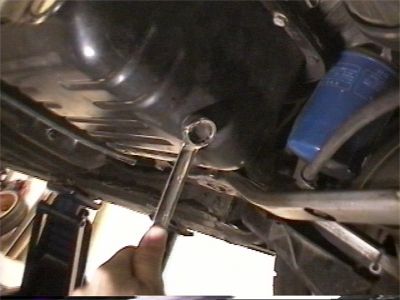
4b. place your oil drain pan below the drain plug and loosen the oil pan drain plug with the closed end of the 17mm combination wrench. Use your fingers to unscrew the plug the rest of the way, you can apply a little pressure to the plug when unscrewing to keep oil from seeping out. When you get near the end of the threads, oil will start squirting out so then unscrew and remove the plug as quickly as possible. Make sure that no part of your body is in the "line of fire" when the hot oil comes spurting out; at the same time, quickly re-adjust your oil catch-pan so that it catches as much of oil as possible. You may have to readjust the pan as the oil drains. Tip: the oil first drains out in a strong stream so position the oil catch-pan a little further in the direction of the stream (towards the rear of the vehicle) than you may first expect; as the oil drains, the stream will die down so the oil pan has to be adjusted back to more directly under the oil drain plug hole. No matter how you do it, it will still be a little messy, so good luck! Wait until most of the oil has drained out before proceeding on to step 5. If you have a new crush washer then take off the old washer from the drain plug and throw it out. If you don't have a new washer, then I guess you can re-use the washer, but it's definitely not cool, although we've all had to do it a few times. But, I think we'd feel pretty bad that we lost our oil and blew up our engine because we didn't replace a 20-cent washer during an oil change.

reach up outside of the "Rod A"
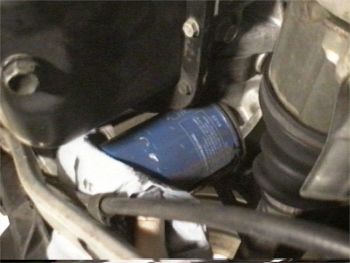
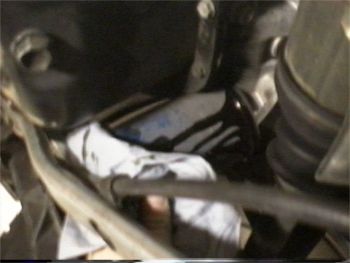
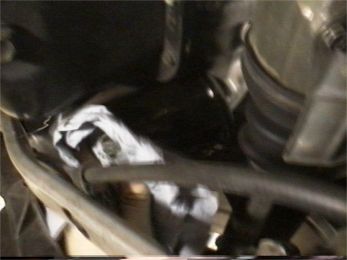
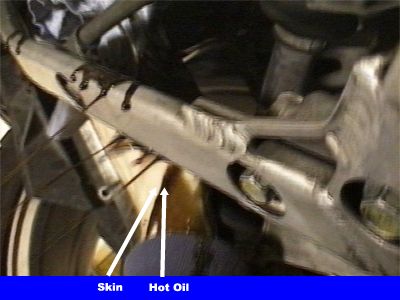
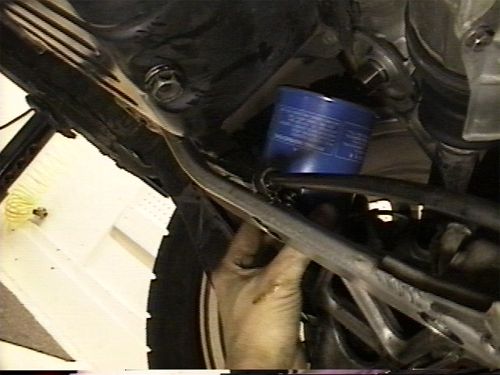
5. Remove oil filter. Start loosening the oil filter with the oil filter wrench. It shouldn't take much effort to loosen if the filter was installed properly. The filter will be loosened by turning in a counter-clockwise direction (looking up from below). Loosen it about a half-turn with the wrench, or enough so that you can loosen it the rest of the way by hand. Now prepare to get a little messy, using some shop rags or lots of paper towels, reach up outside of the "Rod A" support and between the control arms and start unscrewing the filter. There are plenty of threads on the filter so it will take several rotations to remove. As it nears the end of the threads, hot oil will start draining out all over your hand, wrist and arm--so unscrew the last part quickly and as soon as it's removed then hold the filter level to keep the hot oil from spilling all over. Now, carefully bring the filter down without spilling any of the oil (yea, good luck) and drain the filter into your oil drain pan.
5 (continued) Let things drain until they drain no more (if you have time). This is a good time for a beer and to pose by your car because you look totally manly with all the oil and stuff everywhere and the car up on stands.
 Crush
washers
Crush
washers
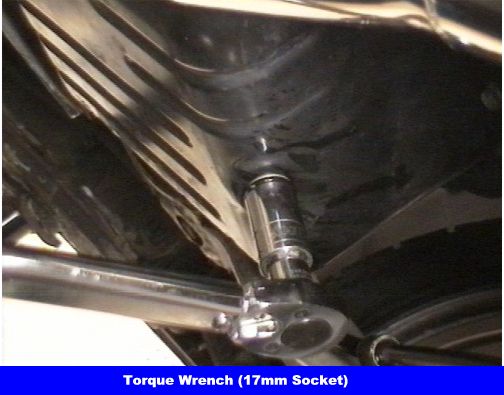
6. Install the drain plug. Place a NEW crush washer (make sure to throw out your old washer) on the drain plug and tighten the drain plug to 33 lb-ft with your torque wrench. Make sure to start the plug carefully by hand, stripping the oil pan is not a good thing.
7. Install oil filter. First clean the area around the oil filter manifold, then lube the filter seal (the black rubber ring on the oil filter) with some new oil. Next carefully screw in the filter hand tight. The service manual says "One turn 16 lb-ft", I just tighten it pretty hard by hand. Note: I like to fill up the filter about 3/4 with new oil before installing. I hear this may be better for the engine when you first turn on the car after an oil change because it doesn't get starved for oil while filling up the filter (because it's already full), this is probably just superstition, but I do it anyway.
8. Add oil. According to the service manual, we should be able to add around 5.3 US quarts. I usually add exactly this amount and then let the oil work itself down into the pan while I do some cleanup. After a few minutes I check the oil and make sure it's pretty close to the top mark on the dipstick. At this point I don't try to fine-tune the level.
9. Assuming your garage is well-ventilated, start up the car for a few
minutes and check the oil pressure gauge on the dash. It should be reading
a pretty normal pressure, if it's way high or way low then something is
wrong. After a few minutes, shut off the engine. Finally, after
waiting about 15 minutes after you shut off the engine, re-check the oil level
on the dipstick and add oil if necessary. It been my experience that if
the oil is just a few cementers over the full hole, then the car will burn or dissipate
the oil somehow down to the full mark. If it's way over the full line,
then I would extract or drain enough oil to make it right.
10. Clean up. This can take a little bit of time. I like to
open up a garbage bag on the floor and place the case of oil with the empties
(caps removed) inside the case. Then I carefully drain the oil back into
the quarts (its hard not to over fill them) and close them up. It's real
nice to have some Simple Green or similar degreaser around to help clean up the
floor, car, tools and supplies. Almost always, your old oil can be taken
back for recycling to the place where you bought your new oil. I take my
old oil to my local auto mechanic where they use an oil heater in the winter.
11. Happy NSXing with your newly freshly maintained NSX!